

Do you have an electric shaver? You want it safe and neat. Good storage can help. Here are simple electric razor storage ideas. You will learn easy hacks you can use at home or on the go.
First, we look at how to store an electric shaver in the bathroom. We show a simple electric shaver organizer idea. You will see a bathroom razor holder that keeps your shaver dry.
Next, we cover electric razor storage for travel. You will find tips on picking the best travel case for an electric razor. We also share a DIY electric razor stand and a tutorial for a DIY electric razor holder.
By the end, you’ll know how to keep your shaver clean, ready, and safe. Let’s dive in!
Why Proper Razor Storage Matters
Do you have an electric shaver? Storing it right helps a lot. It keeps your shaver clean. It keeps it dry. This allows it to function effectively for an extended period.
Good storage stops clutter. No more cords lying around. No more wet blades on the counter. A tidy space feels nice. It is easier to find your shaver when you need it.
Proper storage also boosts safety. Store the shaver upright or in a holder. This keeps it out of the way. It lowers the chance it will fall or get knocked over. That protects the shaver and helps avoid accidents.
With simple storage ideas, your electric razor stays safe, clean, and ready to use.
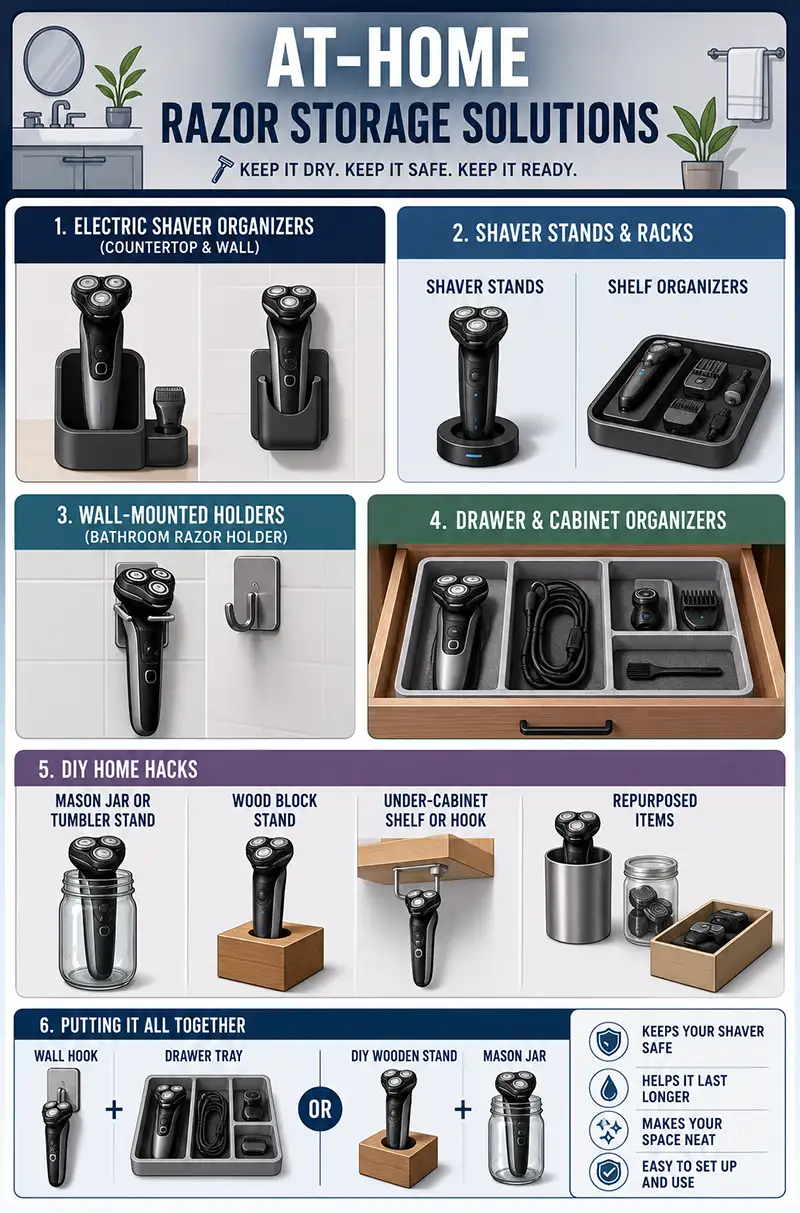
At-Home Razor Storage Solutions
Keeping your electric shaver safe at home is easy. Here are some ideas. Each idea helps keep your shaver dry, neat, and ready to use.
Electric Shaver Organizers (Countertop & Wall)
What is an electric shaver organizer?
An electric shaver organizer is a holder made for your razor. It can sit on your counter or hang on a wall. It keeps the shaver in one place. It stops the razor from lying flat on a wet surface.
Why use it?
- It keeps blades dry.
- It makes your bathroom look tidy.
- It helps you find your shaver fast.
Shaver Stands & Racks
Shaver Stands
A shaver stand holds the razor upright. You place the handle end down. The head stays up in the air. This helps air flow around the blades. Dry blades last longer.
- Many brands sell stands.
- Some stands also charge the shaver. They act like a dock.
- You just set the razor in the slot. It stays in place.
Shelf Organizers
Shelf organizers are small trays or racks on a shelf. You put the shaver and its parts on the shelf. Some have spots for the cord and extra heads. They keep things neat. They stop the shaver from sliding around.
- Look for trays with raised edges. They catch drips.
- Some have soft liners to stop scratches.
- You can place them near a mirror or outlet.
Wall-Mounted Holders (Bathroom Razor Holder)
What is a wall-mounted holder?
It is a hook or rack glued or screwed to the wall. You hang the shaver on it. This keeps the razor out of sight on the counter. It stays away from puddles and spills.
How to install
- Use a self-adhesive hook or rack. No drilling needed.
- Clean the wall first. Let it dry.
- Peel and stick. Wait for the time instructions say. Then hang the shaver.
Why it helps
- Saves counter space.
- Keeps the shaver in view. You won’t forget it.
- Keeps blades away from water spray.
Example
Imagine a small stainless-steel hook near your sink. You hang the shaver by its loop or handle. The razor stays upright. Water drips away.
Drawer & Cabinet Organizers
Why use drawers?
A drawer can hide clutter. It keeps your counter clear. You can store the shaver safely inside.
Organizers and trays
- Use a tray with compartments. One spot for the shaver. One spot for the cord. One spot for attachments.
- Use soft-lined or foam inserts. They cushion the shaver. They stop scratches.
- Use bamboo or plastic dividers. They hold items apart. They stop them from bumping each other.
How to set up
- Measure your drawer size.
- Pick a tray or divider set that fits.
- Place the shaver in one section.
- Coil the cord neatly in another.
- Put extra heads or a cleaning brush in a small box or mesh pouch.
Benefits
- The shaver stays safe and out of sight.
- You open the drawer and see all the parts at once.
- It keeps small pieces from getting lost.
DIY Home Hacks
You can use items at home to create simple storage solutions. These ideas cost little or no money. They still keep your shaver safe.
Mason Jar or Tumbler Stand
- Find a sturdy jar or tall cup.
- Place it on the counter.
- Put the shaver handle-down inside it.
- The head stays up. It can drip dry.
- You can add a small pad at the bottom for grip.
Wood Block Stand
- Get a small piece of wood.
- Drill a hole or slot to fit your shaver handle.
- Sand the edges smooth.
- Put a finish or paint if you like.
- Insert the handle in the slot. The shaver stands upright.
Under-Cabinet Shelf or Hook
- Attach a small shelf under a cabinet if you have a drill.
- Or stick on a removable hook under a shelf.
- Hang the shaver by its loop or cord.
- It stays out of the way and off the counter.
Repurposed Items
- Use a pencil cup or utensil holder to hold the shaver.
- Use a spice rack jar to hold small attachments or extra heads.
- Use a small box or gift box to store the shaver in a drawer. Add foam inside if you wish.
Tips for DIY
- Always let the shaver dry before storing.
- Make sure the stand or holder is stable. You don’t want it to tip.
- Keep it near where you use the shaver. That way, you reach it easily.
Putting It All Together
Choose one or two ideas that fit your bathroom. You can mix them. For example, hang the shaver on a wall hook and keep attachments in a drawer tray. Alternatively, use a DIY wooden stand on the counter, paired with a mason jar for drying after use.
These simple solutions keep your electric shaver safe. They help it last longer. They make your space neat. Try one today and see how easy it is!
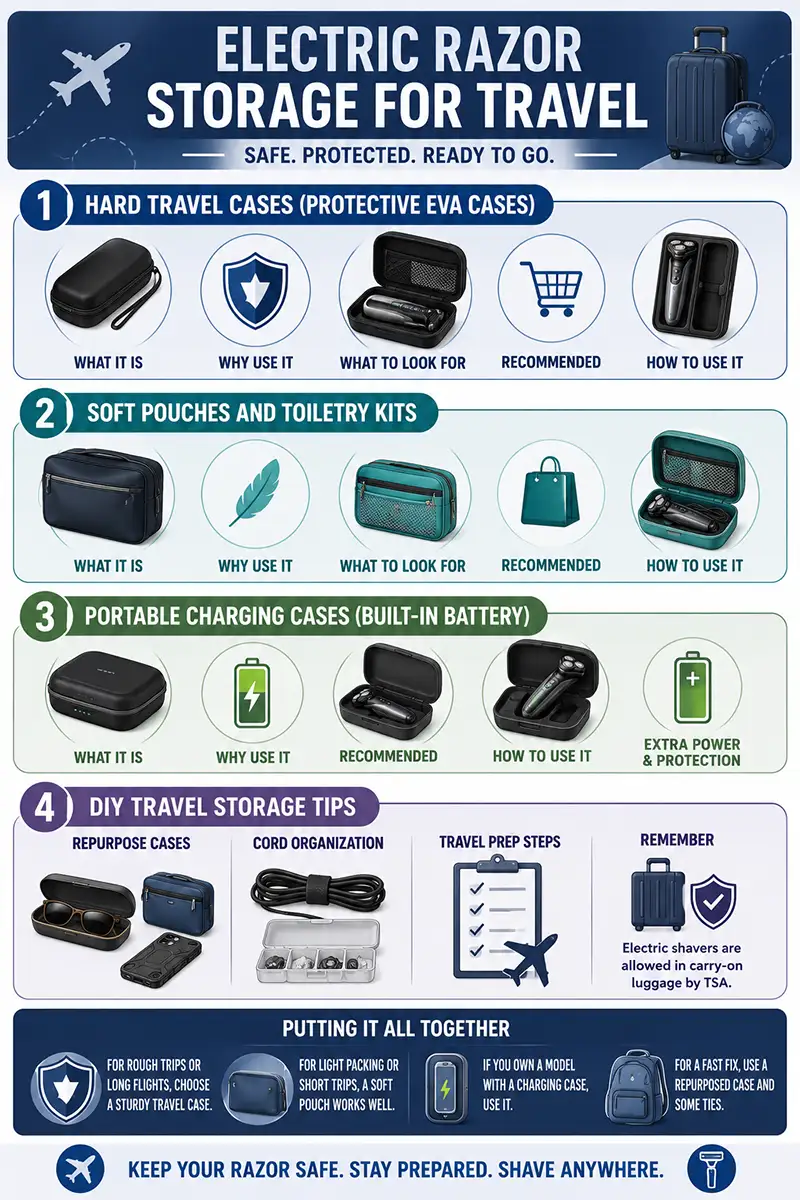
Electric Razor Storage for Travel
Taking your electric shaver on a trip can be a fun experience. But you need to keep it safe. Here are four easy ways to store your razor when you travel. Each idea uses simple steps.
1. Hard Travel Cases (Protective EVA Cases)
What it is:
A hard travel case is a firm box for your razor. It uses EVA foam or a hard shell. This shell stops bumps and light splashes.
Why use it:
- Keeps your razor from breaking.
- Protects blades from bending.
- Holds the charger and extra parts.
What to look for:
- A rigid outer shell that resists drops.
- A soft inside lining to stop scratches.
- A divider or mesh pocket for cords and bits.
- A zipper or latch that closes well.
Recommended:
- LTGEM EVA Hard Shaver Case – small but strong. The size is approximately 7.4 inches × 3.4 inches × 3 inches. It has a strap and an inner pocket. It fits most foil or rotary shavers. It also holds the charger or extra heads. You can find it by searching on Amazon.
How to use it:
- Let your razor dry thoroughly.
- Coil the cord neatly and place it in the pocket.
- Place the razor in the center.
- Close the case.
- Toss it in your bag. Now it is safe from knocks.
2. Soft Pouches and Toiletry Kits
What it is:
A soft pouch is a flexible bag with padding. It zips shut around your razor. Some are meant for toiletries or small gadgets.
Why use it:
- It is light and easy to pack.
- It bends to fit in tight spots.
- Many are water-resistant.
- It still gives some protection.
What to look for:
- Padded sides to cushion the razor.
- A zipper that closes snugly.
- Inner pockets or elastic loops for cords.
- A size that fits your shaver.
Recommended:
- Universal Shaver Travel Pouch – made of neoprene or nylon. Fits many electric razors. Inside, you find straps or mesh sleeves for cords and heads. You can search for “Electric Shaver Travel Pouch” online.
How to use it:
- Dry your razor well.
- Coil the cord and tuck it into the inner pocket or strap.
- Place the razor in the pouch.
- Zip it closed.
- Pack it in your suitcase or backpack.
3. Portable Charging Cases (Built-in Battery)
What it is:
Some shavers come with a special charging case. This case holds extra battery power. It also protects the razor from bumps.
Why use it:
- You get an extra charge for your razor.
- The case is usually complex and sturdy.
- It stops drops and scratches.
- It is made for a specific razor model.
Recommended:
- Braun PowerCase for Series 8/9 – a hard travel charger case. It can add power for weeks. It fits Braun Series 8 and 9 razors. It shields the razor on trips. You can find details on the Braun website or by searching online.
How to use it:
- Charge the case before you leave.
- Let the razor dry.
- Place the razor in the case. It locks in place.
- Close the case. Now you have an extra battery and good protection.
4. DIY Travel Storage Tips
You can also make or repurpose items at home. These tips are inexpensive and effective.
Repurpose Cases:
- Use a padded sunglasses case. It often fits a shaver.
- Try a small electronics pouch or pencil case. Make sure it is sturdy.
- Even a rugged phone case can work for compact shavers.
Cord Organization:
- Use twist ties or a small Velcro strap. Wrap the cord neatly.
- Store small parts (like extra blades or foil caps) in a pillbox or clear zip-top bag. This keeps them in one spot.
Travel Prep Steps:
- Please turn off the shaver and unplug it from the outlet.
- Let it dry thoroughly before packing.
- If your shaver uses removable batteries, remove them if you expect high heat (such as in a hot car).
- Pack the razor in its case or pouch. Please place it in a stable spot in your bag.
- Remember: Electric shavers are allowed in carry-on luggage by TSA. Just keep it in your travel kit.
Putting It All Together
- For rough trips or long flights, opt for a sturdy travel case. It shields from big bumps.
- For light packing or short trips, a soft pouch works well. It is easy to tuck in.
- If you own a model with a charging case, use it. It adds power and protection.
- For a fast fix, use a repurposed case and some ties. Let your shaver dry first.
With these tips, your electric razor stays safe on any trip. It stays clean and dry. You can shave with ease, no matter where you go!
Storage Solutions by Razor Type
Here, we explore methods for storing various electric razors. We cover rotary shavers, foil shavers, and beard trimmers. Each type needs its care. Let’s break it down in simple steps.
Rotary Shavers
1. Larger Profile
- Rotary shavers have round heads.
- They are often bulkier than other razors.
- Pick a case or holder that fits the round shape.
- Look for “3-head shaver” cases if your model has three round cutters.
- A case that thoroughly covers the head helps prevent damage.
2. Stands
- Some stands adjust to fit the shaver.
- Ensure the shaver sits upright, with the head facing up.
- This keeps the head clear of hard surfaces.
- In a drawer, use a thick mat or soft pad under the shaver.
- The pad cushions the rounded blades, preventing scratches from occurring.
3. Protection
- If your shaver has a plastic cap for the heads, use it.
- The cap prevents dust and dirt from accumulating on the blades.
- Always store the shaver in a dry spot.
- Avoid steamy or wet areas, such as directly inside the shower.
- Moisture or pressure on the round heads can dull the cutters.
- A dry, safe place helps blades stay sharp longer.
Foil Shavers
1. Slimmer Design
- Foil shavers have flat, rectangular heads.
- They fit more easily into many cases.
- Many brands include a simple travel cover.
- If yours did, always snap it on before storage.
- If not, use a travel case or a pocket in an organizer.
- This stops the thin foil from bending or denting.
2. Charging Docks
- Some foil shavers come with a charging station.
- These docks hold the shaver upright.
- A lid or cover may protect the blades when not in use.
- You can leave the shaver there on the counter.
- It stays charged and ready.
- The dock also prevents blades from coming into contact with wet surfaces.
3. Home Stand
- A simple tray or small niche works well.
- Place the shaver handle down so it stands upright.
- If you have two or more foil shavers, use a divided tray.
- A cosmetic organizer or a drawer tray with sections helps.
- Each shaver gets its spot, so they do not bump into each other.
Beard Trimmers and Clippers
1. Attachments and Cord
- Beard trimmers often have comb attachments or guards.
- Use a case or organizer with separate slots for each comb.
- A tray with many compartments can hold the trimmer, blades, and guards neatly.
- This keeps small parts from getting lost.
- Coil the cord neatly and place it in its spot.
2. Wall or Counter Mount
- Some holders exist for clippers and trimmers.
- A wall-mount clipper stand allows the trimmer to hang by its handle.
- “Half-socket” holders are small cups or brackets that hold the handle.
- This keeps the trimmer off the counter, making it easy to grab and use.
- If you cannot drill, look for adhesive mounts or use a sturdy hook.
3. Travel Tips
- Many beard trimmers come with a small travel pouch. Use it if you have it.
- If not, pick a padded bag or a section in your toiletry kit.
- Always put a blade guard on the trimmer before storing.
- This stops the blades from nicking or getting dull.
- Keep attachments in a small box or zip-top bag so they stay together.
Putting It All Together
- For each razor type, pick storage that fits its shape and parts.
- Always let your razor dry thoroughly before storing.
- Use caps or covers if available.
- Keep storage spots dry and safe from spills or steam.
- Label or mark compartments if you have many parts. This makes it easy to find what you need.
- With the proper storage, your shaver, foil shaver, or trimmer stays sharp and ready. Try these simple ideas and see how neat your space can be!
Buyer’s Guide: Choosing the Best Razor Storage Solution
Picking the proper storage for your electric razor is easy. Let’s break it down into clear steps.
1. Purpose & Location
- Home Use means bigger holders. You can pick stands or wall hooks. These can have additional features, such as trays or chargers.
- Travelers need small and lightweight cases. Think compact pouches or hard shells you can toss into a bag.
Ask yourself: “Will I use this every day at home? Or will I take it on trips?”
2. Material & Protection
- For Travel: Look for complex cases or EVA foam cases. They say “shockproof” or “waterproof” on the box. These keep the bumps and spills out.
- For the Bathroom: Choose rust-resistant materials, such as plastic or stainless steel. These do not get ruined by steam or water.
3. Capacity & Compatibility
- Check the shape and size of your razor.
- If you have one shaver, you need just one slot.
- If you have extra heads or combs, pick a case with extra pockets or sections.
- Measure your shaver before you buy. Make sure it fits!
4. Mount vs Counter
- Wall-Mounted Holders free up counter space. They keep your shaver off wet surfaces. Great for small or steamy bathrooms.
- Countertop Organizers are easy to reach. They sit on your sink or shelf. But they take up space.
Select a style that complements your bathroom. If you can drill, you have more wall options. If not, use adhesive hooks or a flat stand.
5. Additional Features
Some storage cases offer extra goodies:
- Built‑in Chargers: Like the Braun PowerCase. It charges your razor while storing it.
- Mesh Pockets: Handy for cords and small bits.
- Decide which extras matter most: extra power, neat cord storage, or just a snug fit.
6. DIY vs Purchase
- DIY Hacks: Use jars, trays, or hooks you already have. They cost little or nothing. You can make them your style. But they may look less polished.
- Branded Products: These cost more but arrive ready to use. They often look sleek and hold up well over time.
Balance your budget with the amount of time and style you desire.
7. Ease of Cleaning
Bathrooms get wet and messy. Choose storage that is easy to wipe down.
- Open Designs allows the razor to air dry quickly.
- Removable Liners can be taken out, washed, and put back.
Clean storage keeps your razor fresh and your bathroom neat.
By considering where you will use it, what features you need, and how you plan to clean it, you can select the ideal solution for your electric razor. Happy organizing!
Final Thoughts
Keeping your electric razor safe and dry is easy. A good storage spot makes your shaver last longer. It also keeps your bathroom neat.
At home, you can use stands, wall hooks, or drawer trays to store your items. On the road, pick a hard case or a soft pouch. Match your storage to the razor type—rotary heads require full covers, foil shavers benefit from upright docks, and trimmers work well in multi-slot organizers.
Consider what you need: space, protection, extra pockets, or built-in chargers. You can even make a quick DIY stand with a jar or a wooden block. The choice is yours!
Leave a Reply